Update WordPress manually
To keep your WordPress website secure and improve its performance it's important to make sure that it's always up to date. Usually, you can update WordPress with one click in WP Admin. Minor updates are even done automatically. However, it may happen that you cannot access WP Admin and need to manually update WordPress. In this guide, we explain how to update WordPress manually with an SFTP client.
Did you know?
Our WP Update service can help you keep your WordPress installation up-to-date by updating WordPress, plugins, and themes and removing unused ones for better performance.Use the contact form for Premium Care to get details, pricing, and priority assistance.
Before you begin
We are currently migrating our customer's websites to new servers, and depending on whether your website has already been migrated or not, there are slight differences in how you can update WordPress manually. This guide is divided into two parts which explain the different methods. Please open the relevant guide below the Control Panel screenshots.
How do I know if my website has been migrated?
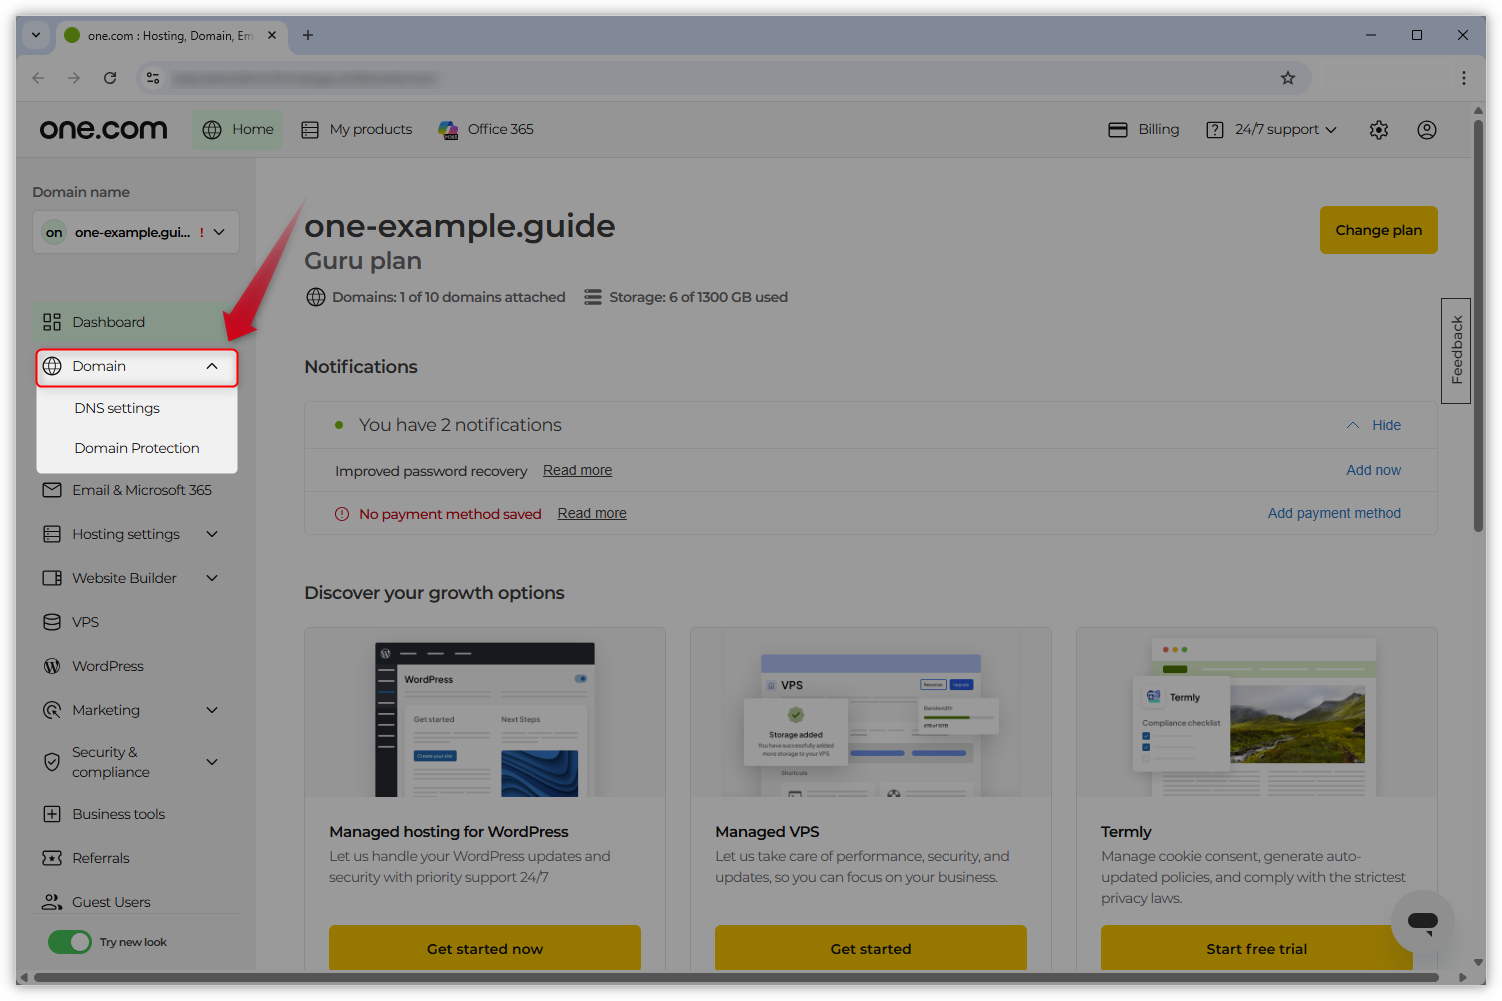
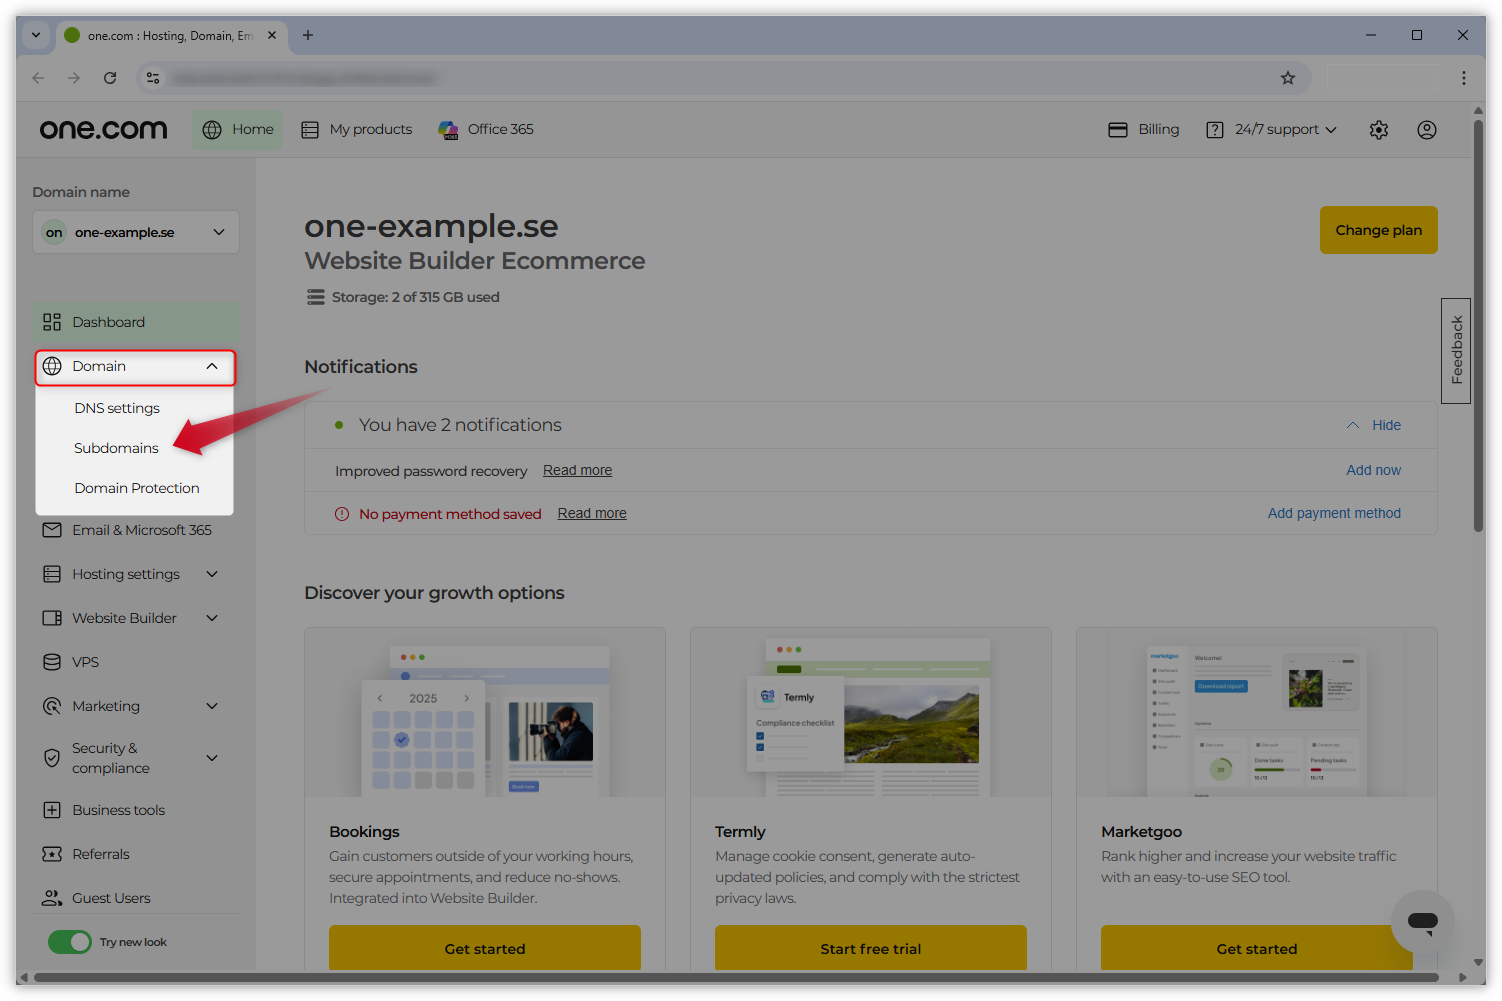
You can find this out easily by logging in to your one.com Control Panel: if you can see a Subdomains option under Domain, your website has already been migrated. See screenshots below for examples.
Non-migrated (no option for Subdomains under Domain)
Migrated
-
Instructions for non-migrated websites
Step 1 - Download WordPress
Note: Before you start, we recommend that you make a backup of your site and disable active plugins. Check out our guides below if you are unsure how to do this.Download the newest WordPress installation files from the WordPress website to your computer.
Step 2 - Extract the WordPress files
Extract the zip file that you just downloaded to a location on your computer.
Note: You can unzip a file on Mac by double-clicking on it or by right-clicking and selecting "Open".
Step 3 - Connect to your web space via SFTP
Next, you need to connect to your web space via SFTP. If you don't have an SFTP client yet, we recommend using FileZilla. You can download it here:
You may need to activate SFTP in your one.com Control Panel before you can connect with SFTP.
- Navigate to your connection details, which are in the one.com Control Panel. Click here to open the SSH & SFTP section directly.
- Under SSH & SFTP Administration, your domain's specific connection details are displayed.
- Open the SFTP client and enter the connection details.
- Click on Quickconnect to log in.
Tip: If it's the first time you log in using SFTP on this device, you'll see a popup message saying that the server's host key is unknown and asking whether you trust it or not. You need to click "OK" to approve the connection.
Step 4 - Delete two folders
Now you need to delete the two folders, wp-admin and wp-includes, from your web space.
Tip: If your WordPress website is on the main domain (domain.com), they will show up in the list of files directly after connecting. If your website is on a subdomain (wordpress.domain.com) they will be in a folder with the name of your subdomain.
- Locate your WordPress folders in your SFTP client. They will appear in the "Remote site" section of the SFTP window.
- Find the folder called wp-admin.
- Right-click on it and select Delete.
- Repeat the same for the folder wp-includes.
Important: The wp-content folder contains your plugins and themes, so make sure not to delete it.
Step 5 - Upload folders and files
Locate the files and folders of the new WordPress version that you downloaded in step 1. They will show up in the part of the SFTP window that is called "Local site". There you'll see all files and folders that are on your computer. The folders with the new WordPress version are most likely saved in the Downloads folder.
- Click on the WordPress version folder in the local site window.
- Select all files using Ctrl + A on Windows or cmd + a on Mac.
- When all files and folders are selected, press Ctrl (cmd on Mac) again and hold it.
- Click on the wp-content folder to exclude it.
- Right-click on the group of selected files and choose Upload to begin uploading the files to your web space.
- In the popup saying "Target file already exists", select Overwrite and Apply for current queue only.
- Click OK. FileZilla will now upload all files.
- Once all files are uploaded you can close FileZilla.
Step 6 - That's it!
You've finished the manual update and your website now uses the latest WordPress version.
You might need to update your database. If this is the case, you will be prompted to do so when you log in to WordPress for the first time.
Tip: Check for updates for your plugins and themes and remember to reactivate all plugins once you've logged in.
-
Instructions for migrated websites
Step 1 - Download WordPress
Note: Before you start, we recommend that you make a backup of your site and disable active plugins. Check out our guides below if you are unsure how to do this.Download the newest WordPress installation files from the WordPress website to your computer.
Step 2 - Extract the WordPress files
Extract the zip file that you just downloaded to a location on your computer.
Note: You can unzip a file on Mac by double-clicking on it or by right-clicking and selecting "Open".
For customers on our migrated servers, the look of the Control Panel and the folder structure within the webspace are slightly different. In addition, migrated customers have new SFTP connection details, can be found in the SFTP page in the Control Panel.
Step 3 - Connect to your web space via SFTP
Note: If you have used SFTP before, note that your SFTP connection details have changed after migration. Please use the new connection details shown on the SSH & SFTP page in your Control Panel.
Next, you need to connect to your web space via SFTP. If you don't have an SFTP client yet, we recommend using FileZilla. You can download it here:
You may need to activate SFTP in your one.com Control Panel before you can connect with SFTP.
- Navigate to your connection details, which are in the one.com Control Panel. Click here to open the SSH & SFTP section directly.
- Under SSH & SFTP Administration, your domain's specific connection details are displayed.
- Open the SFTP client and enter the connection details.
- Click on Quickconnect to log in.
Tip: If it's the first time you log in using SFTP on this device, you'll see a popup message saying that the server's host key is unknown and asking whether you trust it or not. You need to click "OK" to approve the connection.
Step 4 - Delete two folders
In this step, you need to delete the two folders, wp-admin and wp-includes, from your web space. In the SFTP client, you can see the files of your web space in the right hand side of the window, which is titled "Remote site".
- First, double click the folder named "webroots". Then, double click the folder called "by-route".
- You should now see a list of folders named after your domain and possible subdomains. If you have many WordPress installations on this domain, make sure that you choose the right one. Double click the domain in which the WordPress installation you want to update is located.
- Within this folder, find the folder called wp-admin.
- Right-click on it and select Delete.
- Repeat the same for the folder wp-includes.
Important: The wp-content folder contains your plugins and themes, so make sure not to delete it.
Step 5 - Upload folders and files
Locate the files and folders of the new WordPress version that you downloaded in step 1. They will show up in the part of the SFTP window that is called "Local site". There you'll see all files and folders that are on your computer. The folders with the new WordPress version are most likely saved in the Downloads folder.
- Click on the WordPress version folder in the local site window.
- Select all files using Ctrl + A on Windows or cmd + a on Mac.
- When all files and folders are selected, press Ctrl (cmd on Mac) again and hold it.
- Click on the wp-content folder to exclude it.
- Right-click on the group of selected files and choose Upload to begin uploading the files to your web space.
- In the popup saying "Target file already exists", select Overwrite and Apply for current queue only.
- Click OK. FileZilla will now upload all files.
- Once all files are uploaded you can close FileZilla.
Step 6 - That's it!
You've finished the manual update and your website now uses the latest WordPress version.
You might need to update your database. If this is the case, you will be prompted to do so when you log in to WordPress for the first time.
Tip: Check for updates for your plugins and themes and remember to reactivate all plugins once you've logged in.
Related articles: